Monday, March 18, 2013

St. Patrick's Day


Well almost everyone knows that yesterday was St. Patrick's Day.  I am one half Irish from my Mother's side and one half Italian from my Father's side, I have always felt more Italian than Irish, but on St. Patrick's Day I revel in my Irish heritage.  Now when I lived in Denver, I usually wore a shamrock sweater and other green items.  But here in sunny, warm Phoenix area, those clothes are definitely out, so I made this outfit to wear.  The green shorts came from the thrift store.  I made the t-shirt from two t-shirts I got at Walmart. 
I loved the front of this shirt, but always like to have something on the back of my t-shirt since I believe that people see you both coming and going. 

I did reverse applique on the back of the t-shirt with the front of the second t-shirt I got at Walmart , which worked great.  I also shortened the t-shirt a couple of inches.  For me the shorter, boxier look is better.  The hat I found on clearance last year for $ 1.  Now how could you resist a polka dot hat for a dollar, even though it is not much of a sun hat.  It had to go home with me.  As I was gathering my fashions for St. Pat's Day I ran across this hat and I knew it would be perfect to wear.  The frou-frou on the hat is a combination of items I purchased on St. Patrick's Day clearance at Claire's.  I got many compliments on this outfit which I wore with green polka dot tennis shoes.  I bought the lime green shoes and painted dark green polka dots on them with fabric paints.  Now this is my celebrating being Irish.  My Mama is smiling somewhere. 

Tuesday, March 12, 2013

Decorated Easter Hat contest

This post is about my adventure in decorating a hat for a Easter Hat contest.  I am president of a Ladies group at my Church.  Last year I missed the contest because I was visiting my fabulous grandbabies in Denver and Sheridan Wyoming.  I have never met a fashion challenge I didn't like, especially a hat.  I was told that the hats that won last year's were more quirky than functional.  I was trying to do both.  I don't believe in throwing stuff on a hat unless it adds to the design in some way.  Also those hats you would never wear except for them to be in a contest.  I wanted my hat to be functional.  I wanted to wear it again.

As a base, I started with a hat that I already had on hand.  I had decorated it for Easter several years ago, and only worn it twice I think.  The hat just didn't fit well on my head. I liked the decorations.


I started by making the top part of the hat.   

I sewed my fabric to Peltex.  Not the fusible kind.  I felt that might make it too stiff.  I did sew a couple rows of boning to the side that was not going to be squished so it would hold it's shape.   Before I stitched up the sides I sewed the ribbon in equal distance rows.  Somehow the math worked out and my base fit the hat.  Same went for the top of the hat.  Sometimes I am so lucky. 


 I thought my finsihed hat was this top version.  I wasn't totally happy with it.  I think I was unhappy with the large poka dot ribbon on the smaller poka dot fabric.  Too jaring I thought.  My husband suggested putting ribbon bows on the top of the hat where the buttons were, and the rest, so to speak is history.
After bows and rhinestons my hat is finished and I love it.  I will definitely be wearing this hat on Easter and perhaps for other occassions.  I have titled this hat PINK EXPLOSION.  If you are wondering I won second place.  A quirky hat won 1st place.


Monday, March 4, 2013

Wig heads revisited


Well some of you might remember that the first blog post I did was of some wig heads that I painted so I had some place to hang my hats and fascinators when I wasn't using them.  I wanted something more interesting that just the white styrofoam wig heads you can get at Hobby Lobby.  The long neck models I ordered on-line.  I had seen a couple of different versions out and about in shops.  This first picture is what that first group looked like.  They were different hair and clothing colors of course.  I liked them very much, but again, I was on a quest to make my faces funkier. 

I needed to paint a few more ( too many hats ) so recently I painted these new ones.  I certainly did a different face, and I think the hair looks different because of the faces.  Now I know that not everyone will like my new faces, but I definitely like them.  I think these new ladies look like they have attitude and we can never have enough of that !!!!!  You would never guess that I love poka dots, checks and stripes.  

Thursday, February 28, 2013

Funky Aprons


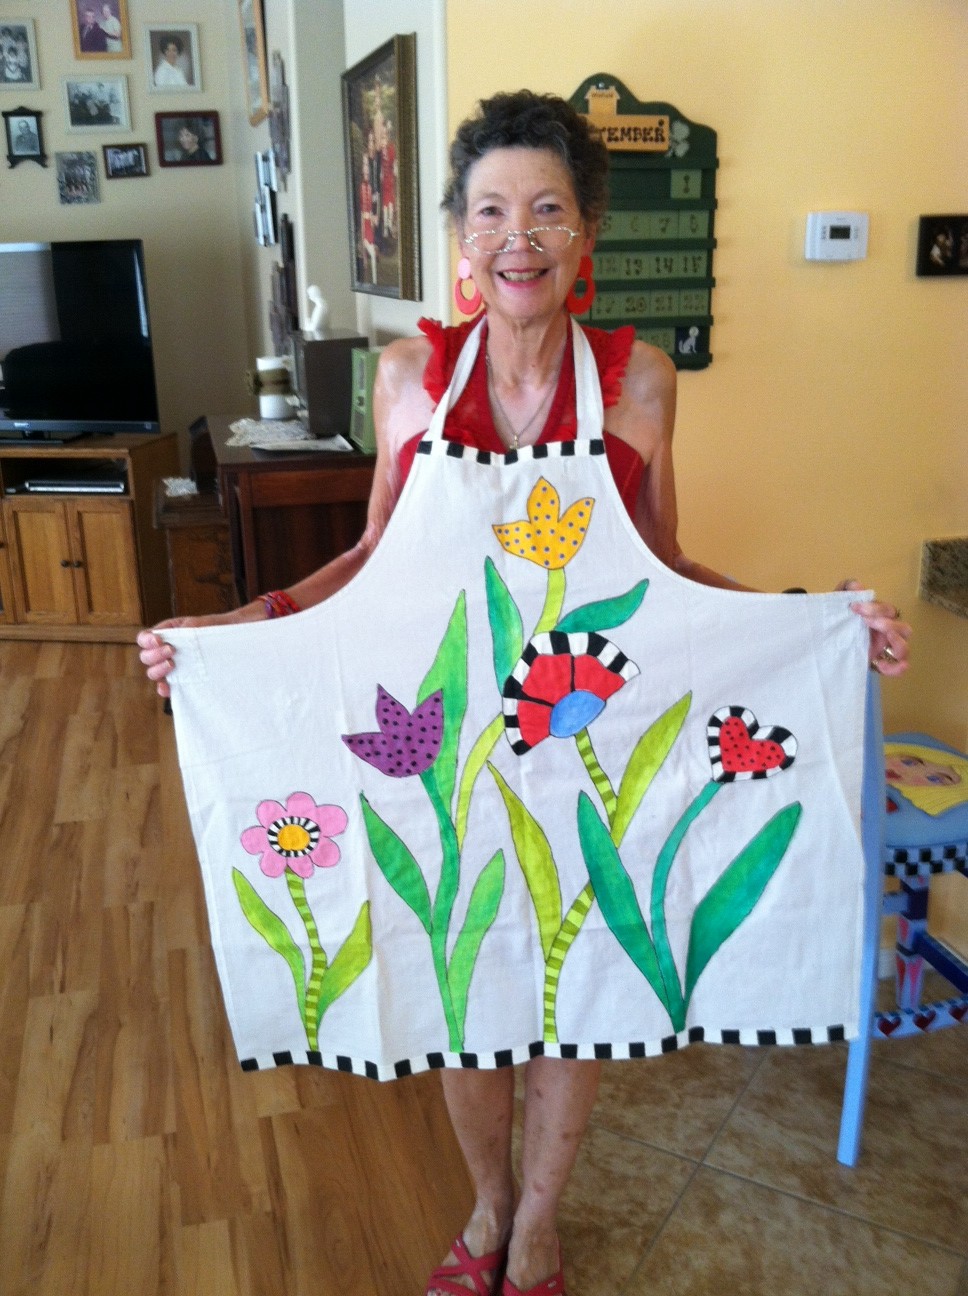
This post is about my continuing journey to more funkieness in my creative work.  Now some people would ( and have said ) is that possible, and my answer is a resounding yes!!!  I have a dear friend in Memphis, who gave me a couple of boxes of vintage linens about three years ago.  When I went through the boxes, I found quite a few long aprons.  When I mentioned it to her, she told me they belonged to her grandfather who was a butcher.  I decided that I would give her a couple of aprons back decorated in some way when I returned to Memphis last fall.  First of all my friend is 5 feet nothing, so I cut about 10" off the bottom.  From that I made the back ties.  I used buttons from the button jar that was also in the vintage linens she gave me to attach the back ties to the apron.  Then I painted both aprons. 

I drew out my designs on paper and transferred the design to the apron by ziz-zaging in small black stitching through the paper onto the apron.  I then painted the design with fabric paint.  After I finished the painting I did another heavier ziz-zag over the first to act as a bold outline.  I really love both aprons, but I must admit to a fondness for the lady.  I love her.  I have been searching for a face and body that would be a signature for me and I think this character is definitely going in the right direction, and the flowers are definitely more free than I have ever been able to accomplish before.  I also will say that these aprons are separated from the chairs about two months and there is a marked difference in the faces that I drew.  I finished by heat setting.

Monday, February 18, 2013

painted furniture

I have not posted anything in several months.  I have lots to share, but I just don't understand my blog well enough, I guess.  My son has been here on a visit and he has helped me a great deal in understanding this blog.  Hopefully, I will be better at how I post.  This post is about some chairs I painted  back in May.  They were blond wood.  I first painted a coat of primer.  Then I painted the chairs and sealed them with a sealer. 


The chair seats I enjoyed doing very much.  I primed the canvas with gesso and then free hand drew the faces on the canvas.  These faces were so much fun.  I have been interested in faces for several years, and feel like they are evolving so much.  These faces are funkier than the ones I have drawn and painted before and I feel so much more confident with them.  Elineor Piece Bailey once told me to PRACTICE, PRACTICE and PRACTICE to develope the skill and that has definitely helped me.  I have come a long way with drawing faces in two years considering at that time I couldn't draw them at all.  I finished the canvas seat covers with a couple coats of scotchguard and so far so good.


These are the finished chairs.  The chairs themselves were alot of work.  The faces not.  I have enjoyed having them at my kitchen counter and have received many compliments on them.  I feel they are add to the funkieness of my home decor.  

Tuesday, May 8, 2012

This post is about IPad covers.  I really like to have unusual items and I really love this IPad cover which can be adapted for the Kindle and the Nook, both of which I have done.  You need to start with a hard back book.  I got mine at our library used book store and the books already had the library book jacket cover on them.  You can buy the library book jacket covers on-line pretty cheap, but it is worth trying your library first.  You cut out the guts of the book at the spine.  Some books are easier to work with than others.  You need to do some measuring so you can cover the inside of the book.  I use fun foam from the hobby store for the padding and it works really well.  You can sew through it and I also used nylon ripstock for the fabric.   I used Aileen's OK To Wash it glue to glue the whole center to the book.  I have found it really works to adhere fabric to surfaces.  The last thing I did was used gromets on the elastic edges.  I feel that is a weak area and needs reinforcement.  The gromets I used were from the Tandy Leather store.  They are finished on both sides and easy to put in. 

This is the view of the Ipad and center of the book cover.


I also put elastic from the front of the book to slide the back of the book. This keeps the whole cover together so it doesn't fall open if you drop it.


One of the great things about these book covers is that your IPad/kindle/Nook doesn't look like  those items.  If you have them sitting on your car seat etc, they look just like a book.  I made a friend a Nook cover and she had it sitting on the a night table in her room.  Someone broke into her home and took almost everything, even things that had no value.  They even took her Nook cord and plug but left her Nook on the bedside table.  She feels they did this because they thought it was a book.  These covers are fun to do.  I love finding cute books to use.

Tuesday, April 24, 2012

Altered t-shirts

I have not posted in a couple of weeks due to what I now call OUR FABULOUS GRANDBABY SPRING BREAKS ROAD TRIP.  When we got back here to the Phoenix Arizona area, we jumped into full hot summer temperatures.  I would like to discuss t-shirts.  We buy them when we visit a fabulous place or city or perhaps a college shirt, but then what about them.  As far as I am concerned, I have never worn t-shrits alot.  They haven't fit in my weather temps, but also, for me, they are just not that flattering.  Perhaps that is true for alot of women.  I have posted what I have done with my t-shirts.  I have made tank tops out of t-shirts.  It is easy, peasy.  Cut apart the t-shirt removing the neck ribbing, and cut across the shoulders and then remove the sleeves.  Use an exsisting tank top pattern cutting the front and back on the fold.  Then cut out the neck and sleeve binding out of the sleeves.  If you don't have enough fabric on the sleeves for the facing, buy another t-shirt at the thrift store of similiar color and use that for fabric.
These tshirts are the ones I altered to tank tops.
     The second thing you can do to t-shirts is to cut out the neck ribbing and replace that with another knit facing.  Again it doesn't have to match, and you can use another t-shirt purchased at the thrift store.  Sometimes just getting rid of a high neck ribbing makes a huge difference in how that t-shirt feels.  Another thing I do is shorten them and either hem them, or add a contrast t-shirt binding. Hopefully these ideas will inspire you to look at your t-shirts differently.