Friday, June 2, 2017

A Tale of Two Hats

I love hats. I wear something on my head all different seasons of the year. I purchased this hat at the Rose Bowl Flea Market on Mother's Day Weekend in 2016. I found the hat squished in a basket for $5.As you can see it is too big size wise and pretty tacky looking. I knew it needed an update and remodel. For some reason, I associate my hats with movie stars. I have several Aubrey Hepburn, Grace Kelley, Joan Crawford, Katherine Hepburn hats. When I saw this hat, I right away named it Gloria Swanson.

 I used a heat gun to take off the white leaves and the old sequins.and rhinestones.
 This was the after view which is quite improved. My friends wanted me to save the feathers, but unfortunately they were not in good shape and working on the hat was hurting the rest of the feathers that were left. I took off the feathers, which made it easier to shorten the hat to make it fit better.

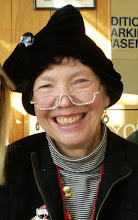
I added horsehair to a smaller fascinator that I had just purchased and sewed it to the hat along with a rhinestone trim that I had on hand. I really enjoyed wearing this during this past winter. It is very 1920's looking. I believe that Gloria Swanson would enjoy being seen in this hat.

 This second hat, I found on clearance for $16 at Burlington Coat Factory back before Christmas. It had a very large printed horsehair brim along with a large bow type decoration on the side.
 A very Kentucky Derby type hat or if Prince Harry leaves his girlfriend, I am ready for a Royal Ascot invite..

 So when I got home and really looked at the $16 hat, I decided that I wanted a second hat (there were three of them. My kids said GO FIGURE. I on the other hand had vision). That I could salvage the printed horsehair that I had never seen before and was easily more than $!6, and also use the second big bow type decoration as a fascinator.

 I know it is hard to tell but I took a row off the printed horsehair brim to shorten the brim and left the hat as it was.

I took the big bow type decoration off the second hat and added this smaller fascinator along with some more printed horsehair.


And got this rather interesting fascinator. My new motto of Go Big or Go Home certainly applies to this hair decoration.which, no lie, I enjoy wearing.

Painted Furniture 2017


These are my 2017 pieces of furniture that I paint in the Arizona springtime of April and May. A shout out to Pamela Allen for all the help and encouragement she has given me on painting and decorating furniture..This first piece was a table that I inherited from my Mama. The table had a manufacturers mark on the bottom of the table but was not in very good shape. My Mr. Partner in Crime, re-glued the piece to make it sturdy. As with all my pieces, I did a light sand to rough up the wood. Washed it down with TSP and then if if was a dark piece of wood such as this table, I did probably two coats of Kilnz  2. A water based product .For painting I use a combination of Home Depot sample jars of flat paint (since I am going to use Varathan Gloss Varnish which will add a shine) and craft paints. I used Liquitex Matt Medium to adhere the fabric. After adding the stencils, writing and decorating, I put about 11-12 coats of Varathan Interior Gloss Varnish (clean up with soap and water). Then I do a wet sand and put another one or two light coats of varnish and you are done.
 I love using fabric for decorating my furniture. I am not a confident painter, so using fabric gives me a medium that I am comfortable with and allows me to have a very large source of material. This fabric is from Lorelie Ladies prints. Last year I added stencils which I also used this year.
I love how this turned out and My Mama, who would be 98 today, would be so tickled pink that I made this my own and I am using it.


This second piece I picked up at the thrift store a couple of years ago. I started it spring of 2016 and didn't finish it because I could not come up with a design. It looks like a large book. So it sat for a year partially painted. This year, I had a Ah Ha moment and decided to treat it like a book.
 I decided to incorporate writing in this piece. First time I have done writing and not used stencils for words. Nerve wracking. I created some phrases that described how I felt and had my Mr. Partner in Crime pick the one he liked best. I drew it our on paper to make sure it would fit in the design. As usual, it didn't work out quite as I wanted but it still worked out pretty good. You can see that I had to be creative to make all the writing fit, although it fit just fine on the paper sample.


This was a table I purchased in May of 2016 on my 2nd annual Mother's Day Weekend Rose Bowl Flea Market trip.

 For the first time this year, I used stenciled words on my pieces. I was worried about making the words fit in the space and have the correct spelling. I wrote the words out on a piece of paper and proceeded to stencil them on the table. When I texted the picture out to my family and friends only one friend realized that I misspelled create in the bottom left of the below picture.


Thankfully she said something to me. Even though I had spelled the word correctly on the paper, I misspelled it on the table. Although I thought it looked strange, I ignored the feeling.

 Thankfully I had left enough space between the letters to creatively add a funky R to correct the spelling. I went back and did a little more funky letters on my words. I think it made my table words cuter.
            I also love how this piece turned out. All the above pieces are in my family/living room
 This piece was a door to a built in storage piece that came out of my daughter's dining room 1930's home. She couldn't figure out what I was going to do with it and actually at the time I didn't know either.
 The center of this piece is fabric. I left the knobs on the piece and Mr. Partner In Crime added coat hangers.This is hanging in our laundry room. Again I really like how it turned out and my daughter was shocked with pleasure when she saw it..
 This piece is the largest piece I have ever done and is the kitchen table of My Mr. Partner in Crime's family. Again a manufactures label on the bottom of the table. I have to admit that my Mr. Partner in Crime was not thrilled about my plans to paint and decorate this table. He doesn't always see my vision.
 The following pictures show the design process. I did draw out the design on paper.

 After all the checks were painted on the side of the table with the sun type design, I decided that all those checks were too heavy for the area with the heavy checks that were on the drop leafs on the ends of the table and I painted over the area and left only a few checks which you can see in the second picture below.

 I refer to this as a story table. It describes my almost 47 years with Mr. Partner In Crime. The stenciled stars in honor of all the meteor showers we have made the effort to view. Along with a moon for the lunar eclipses we have gotten up in the middle of the night to view. The words describe our marriage and the flowers, Mr. Partner In Crimes hope that I will want to be involved in planting and raising flowers in our yard.  Unsuccessfully I might add. He absolutely loves how this piece turned out.
 This is the final piece. It was in our bedroom.
Again I am very pleased with how all these pieces turned out. I already have my pieces of furniture to paint for 2018