Monday, March 27, 2017

Jacket Adventure

After I made the graphics t-shirt dress in the below blog, I decided that I wanted to make a t-shirt graphic jacket to wear with the dress.The first thing was collecting the t-shirts, which I had left from the dress project. I wanted to use more colors in the jacket than I did in the dress because some of the t-shirts that I had were wonderful and had more colors in them. The next thing  was to find a pattern that I thought would work the best to display the graphics on the t-shirts. This Butterick pattern is from the 1980's I believe. One thing about the old patterns is that they only contained one size vs the newer patters which have multiple sizes in one envelope. My measurements worked with this medium pattern measurements, but as you will often find, the measurements don't always tell the story about how the pattern will fit. This pattern was too big and I did have to make some adjustments.
After I got the jacket designed and pieced like I did the dress, I put the pieces together and decided the jacket was too wimpy.   

               This top picture shows the jacket top front and backs pieced. The solid black is the wrong side
I decided that to give the jacket more body, I would do an interlining. You could use a muslin but I decided to use a batiste, which is a lighter weight fabric. I wanted more body but not weight. This picture shows the interlining. I also put in a black lining.

This picture shows the pieced front and back bottom pinned to the interlining. After putting the jacket together, I finished the jacket edges with a cotton quilt binding.  For me that is the easiest way to finish off the edges of my  garments. lined or not lined. I added buttons and buttonholes.

This is the back finished jacket.

The nice thing about this jacket is that I can wear it with many different pieces of my wardrobe. Here it is with leggings.

Here is the jacket with my t-shirt graphics dress

Back view of the jacket with leggings. I love how this jacket turned out and I have worn it a couple of times and love how fun it is.  Now I have my Mr. Partner In Crimes's matching t-shirt.

Friday, March 10, 2017

Fun Funky Garments

This post is about two dresses that I just finished and I am very excited about. Both used t-shirts that I got at the thrift store. My go to fabric store. I often purchase garments there more for the fabric than I do to actually wear.
 A friend of mine was visiting and we were thrifting. She happened to find this wonderful two piece outfit. I was so excited I didn't even think to check the size but decided this MUST go home with me. When I got home, I discovered that this was a size 4 petite. Now I could fit in this but I felt like a stuffed sausage in a bun. That was not going to discourage me. I knew I had some altering to do over and above what I had wanted to do just to make it fit.
 First I cut off a portion of the bottom dress because I was going to add a altered bottom. I then cut apart the side seams and used a similar red t-shirt to sew in the sides to make the dress bigger.
 This might be hard to see, but I don't often make drawings of what my ideas are for my garments. Usually those ideas just stay in my brain since those ideas often change but this time I did make a drawing. I am trying to improve my drawing skills.
 For the bottom, I cut off under the arms of a EX large men's red t-shirt for the base of the peplum.
 I decided what size I wanted my striped panels to be which were different red and white t-shirts. Don't ask me how I determined this since I often do fuzzy math.
 I decided the first bottom had too much red in it. I decided to split the red sections with another stripped panel, which of course make the bottom peplum fuller but I had no problem with that. The panels were also different sizes but they were similar.
 As often happens with I do an size adjustment on the side seams, the garment is sometimes too large in one or two body areas. On this piece it was the waist. So I added some elastic in the back to make me have a slightly more waistline. Of course that is not in these pictures.
 Now I had to work with the overdress. I cut off a section of the bottom and also split is down the front. I also had to split down the side seams to add red t-shirt fabric to make it sorta fit me. One problem that I discovered was (and you can see this in this picture) was that this overdress was not cut on the grainline and didn't hang right. It twisted. Now others might not have noticed this but it bugged me. I added a two inch band to each front side of the overdress and did buttons and button holes and wore it once. I decided that the overdress covered up too much of the dress, which I loved the most of the two pieces. So I went home and cut off most of the overdress and made a short top.


I have received so many compliments when I am in this dress and feel very sassy. I know that no one would guess that I altered this dress so much and totally changed it. I am guessing most people wouldn't even know that I made it.


This dress is my very latest creation, and absolutely love this. This dress and the red outfit above, may become my new two favorite looks. They are definitely going to be my Red Carpet International Quilt Festival looks this year.

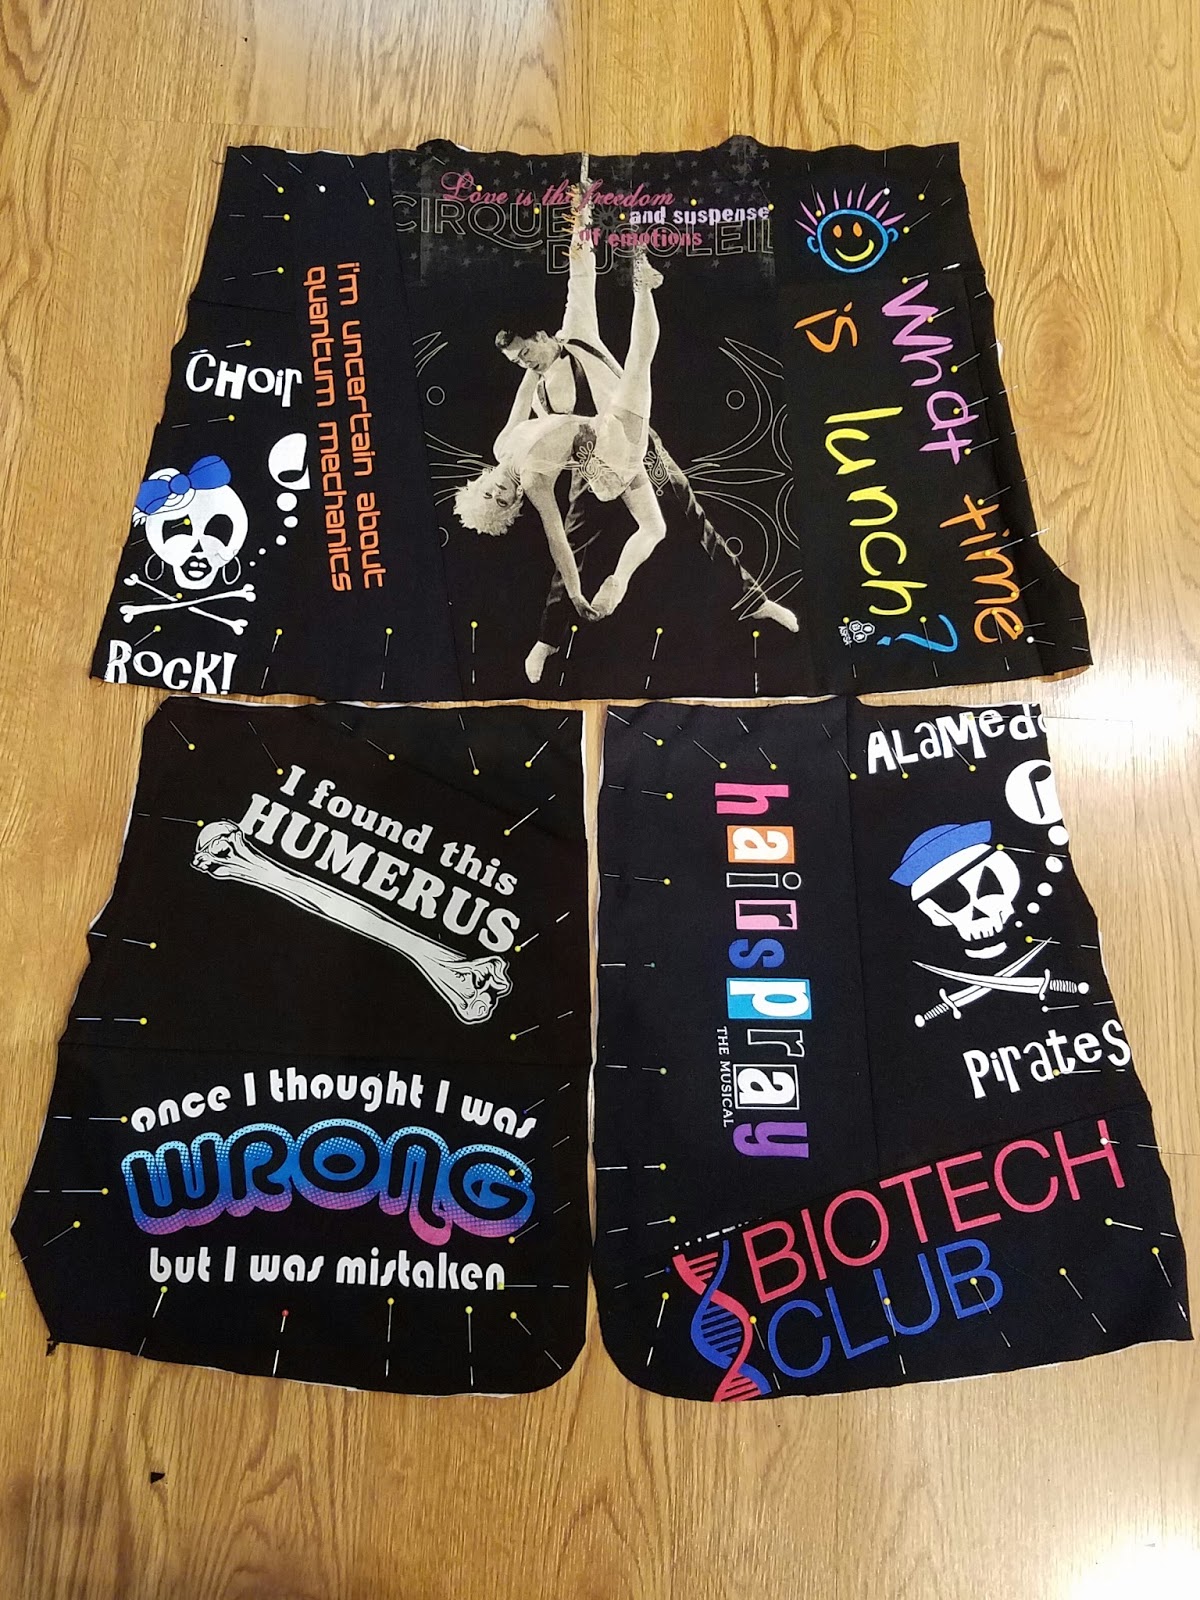
Sharon Richards from the Quiltart list and I attended a fashion exhibit two years ago in Chandler Arizona. One of the young designers had made a strapless dress out of the graphics of recycled t-shirts. I decided right then and there that I wanted to make my own version and while I have often used saying from t-shirts, I had never used them quite like this. So I collected t-shirts from the thrift store with funky sayings on them.
 This is what I came up with. It is so much fun.
 In these pictures I didn't have any sleeves in the dress but is over a black undershirt. I decided to put short sleeves in so I can wear it in warmer weather and then wear it with an undershirt like in these pictures when the weather is colder.

My plan is to make a jacket to wear with this and make it with more colored t-shirt graphics than the mostly red and white ones I used in this dress. My Mr. Partner In Crime LOVED this dress. In fact he liked it so much, he wanted me to make him a matching shirt. So we just went to the thrift store and picked out some manly t-shirt graphics to use in his shirt. How cool is that  !!!!! More on his outfit when I get it done.

Decorated Luggage Travel Not Boring

I have been painting luggage for a few years now and of course I must say that I love my luggage to be as funky as I am. A couple of years ago, I was at the airport baggage claim standing by a woman waiting to get our luggage. As the bags began to arrive, she looked at the luggage coming out and as my piece appeared, she said, "I bet I know which piece is yours". Just thinking about this story makes me smile. Two years ago I got a lighter piece of luggage right before a trip to the International Quilt Festival in Houston Texas. I quickly painted it with just black and white checks and the finished product just never seemed right to me. Recently, I bought a Loralie Ladies panel that had larger designs on the fabric. I got a idea that I could use the designs on the luggage and here is what I created.
 All of this is fabric. I applied the fabric with Liquitex Mat Medium just like I do my furniture. I was trying to figure out how to protect the surface design from the severe wear and tear at the airport. I decided that I would try covering the front of the suitcase with several coat of Varathane clear coat glossy (which I had on hand) after thinking about what my friend, Pamela Allen said about covering placemats with Varathane which she still used. On my furniture that glossy Varathane doesn't look quite so shiny as it did on my suitcase. I just flew with this altered piece of luggage and it went through the whole airport/flying/luggage arrival process with flying colors.

I have a friend and we plan a yearly trip to LA on Mother's Day weekend. I fondly call this trip our Thelma and Louise Road Trip. Now I have never seen the movie Thelma and Louise and after referring to our trip by this name, my Mr. Partner In Crime told me that did I know that Thelma and Louise robbed a bank, killed Brad Pit and drove off  cliff? So I now refer to our trip as our Thelma and Louise Road Trip sans robbing a bank, sans Brad Pit and sans driving off a cliff. The only part I am sad about is the sans Brad Pit part. While we are in LA we go to the Fashion District and then we go to the Rose Bowl Flea Market. On our last trip she had this great little rolling tote that she used at the flea market. It was black with white polka dots and was just fabulous. I asked her if she would pick me up one the next time she went back to the store and I would reimburse her for the cost. When I saw her a few weeks ago, she presented me with the old black and white polka dot one from our last trip and the one below. She told me she thought I might like the one below and that I would enjoy making it my own.
 Well, I had just finished up the above piece of luggage and still had several of the Loralie Ladies. I decided to do the same technique on this piece.
 I painted the white polka dots on the black fabric and the black polka dots on the grey fabric with fabric paint


 I then painted on several coats of Varathane clear coat semi-gloss.  I forgot to say that I use the clean up with soap and water Varathane. I did not think the Varathane changed the hand of the fabric very much. It is still pretty soft and the semi-gloss is not so shiny. I am very happy with how these pieces turned out and I am excited to use my cute rolling tote  at the Rose Bowl Flea Market our next Thelma and Louise Road Trip.